 Scanning & Printing
All photographs and images will need to be scanned and emailed to us as a digital image-file. Or if you prefer you can provide a link to your uploaded image/s in your image storage facility such as Dropbox etc. The most common file formats for use are JPG and PNG.
If you do not have access to a scanner, we suggest that you approach friends or family who may be able to assist, or visit a store which has a photo processing lab and scanning facilities available.
Scanning of paper based photographs, images and documents.
Generally your Scanner Resolution should be set to between 300dpi and 600dpi, with the Scale Resolution set to 100%.
Scanning Tips:
Because most home based color printers and commercial photo centers print at 300 dpi, you will also need to scan your original image at or above 300 dpi, to be able to print the image at the same size as the original.
For the best results, we suggest the following:
- Scan your photograph/s using a designated, stand-alone Scanner or special scanning app. To ensure that the image/s that you are supplying us with, are both of a high quality and high resolution. We suggest that you do not simply take a picture of the photograph, image or document using your mobile phone or Tablet.
- Ensure your photograph and the scanning surface of your scanner is lightly wiped with a clean and dry, lint-free cloth, to eliminate finger prints and dust.
- While scanning your images at 300 dpi is sufficient for printing the image at the same size as the original, we recommend that you scan your images at 600dpi for the following reasons:
- it is likely to eliminate what is referred to as moiré patterns (or interference patterns), often seen as strange lines or patterns in certain parts of a scanned image.
- if you wish to have your photo enlarged when printing, it should be scanned at or above 600 dpi.
- it will provide more pixels for us to work with and therefore enable us to achieve a better quality restoration work.
As a general guide, the relationship between the Scanning Resolutions and optimum Print Sizes are as follows:
Scanning the image at 150 dpi will produce a printed image at half the size of the original image.
(Actually 1/4 of the original paper size) =
=![]()
Scanning the image at 300 dpi will produce a printed image of the same size as original image.=
Scanning the image at 600 dpi will produce a printed image twice as large as the original image.
(Actually 4 times larger than the original paper size)=
Important!
When scanning your images please ensure that both your scanner software has the Output Resolution (sometimes referred to simply as Resolution) set to at least 300 dpi (preferably 600 dpi) and that the scale resolution or scale factor be set to 100%, as displayed below.
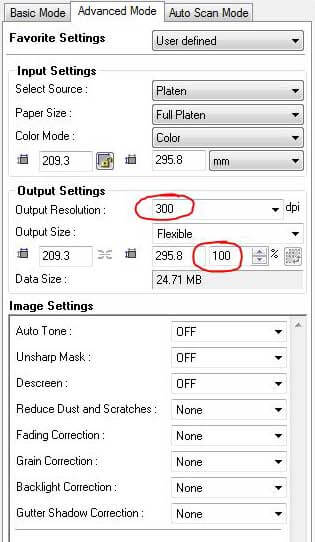
NB. The setting in the scanner software for the scale resolution (or scale factor) can sometimes be difficult to find, but generally it can be located by looking for a field showing a percentage (%) sign, as displayed above (to the right of the circled number 100).
Also, if your scanner software has any "Image Settings" as displayed in the lower part of the image above, please leave them all set to OFF or None. Enabling these settings will add additional unnecessary work to the restoration process.
Scanning of slides and negatives.
Please note that not all scanners are capable of scanning slides and negatives (refer to your scanner's user manual). That being said, as 35 mm film negatives and slides are much smaller in size than paper based photographs and images they do need to be scanned at a much higher resolution. However, as the software settings for the scanning of film and slides varies greatly between different brands of scanners, it is recommended that you refer to your scanner's user manual.